Sunday, March 12, 2023

Smelly sulfur smell from one faucet? How to clear up the smell

 Many a post on the internet speaks of smelly hot water, or a rotten egg smell from your hot water when you take a shower.  This is a well know problem however the cold water is a less common issue.  Moreover, just from one faucet is even more rare.   Let me share my experience and how I mitigated the issue.  The tl;dr version is that you have to clean the pipe that supplies that faucet with a choline based solution.

Situtation

One bath sink in a two sink bathroom, the cold water faucet would smell like rotten eggs after sitting for a few days.  Smell would continue to get stronger over time.  Sink next to it has no smell.  Also, no smell from the hot water, just the cold water tap for the first few seconds.

Remedy

My setup

I have a water filter and a softener.  I also have an iron filter.  They are installed in series (iron filter ➡ filter ➡ softener).   The iron filter is great, and takes care of most of the iron such that I don't have a hot water iron/sulfur smell.  I do however have residual iron on the inside of my pipes from the months before my water filtration system was installed. 

My solution

Turn off the water to other parts of the house, outside spigots, or any other value that I could turn off that was AFTER the faucet in question

  • Bypass my water softener
  • Bypass and drain my filter, removing the media; clean it
  • Place a new filter media and a small amount (maybe a jug cap full of bleach) of chlorine into the housing of the water filter
  • Reconnect the filter and energize it
  • Run ONLY the faucet in question long enough until I start to smell chlorine (bleach) from the faucet
  • Shut it off, and let it sit; an hour or so; and do not run any other faucet or water using item
  • Run that faucet nonstop for at least 15 minutes, but I rant it for an hour and verified I did not smell chlorine after shutting it off, walking away, and coming back and turning it back on
  • Run your outside spigots to flush any more chlorine out of the filter/system and then use your house as normal

(you may have to do this every so often depending on the cause of your smell, see below)


The post mortem

What I learned is that the supply line that provides cold water (and hot) to that faucet runs over my HVAC system, and in the winter the pipe warms up, maybe to 80' or 90'F depending on how long it goes unused.  That is warm enough to promote iron eating bacteria to have a party, and when they party they are stinky.  The hot water supply does not have this problem, because while it may warm up (or cool down) to this same temperature, the hot water that runs through there is likely warm enough to kill the party enough.  That line also runs in a slightly different location and is not effected as much by the HVAC.  This is why the problem for me only occurs over winter and starts to manifest itself in early Spring, not not every year.


Using iMac 27" with a '20 Macbook Pro 16

Do you want a 27" screen?  Do you have an extra iMac sitting around?  Keep reading.

I'll walk you through how I got my iMac 27" to be used a a Target Display for my 2020 Macbook Pro 16.

Requirements

1) You need an iMac of somewhat recent vintage.  Mine is a 2010 I believe. 
2) You need to ensure it has a Mini Display Port on the back
3) You need to have a Mini Display Port cable - male to male
4) You need a Mini Display Port to USB 3/thunderbolt3 adapter


For #4, I reached out to the trusty web and purchased the ASL All Smart Life USB C to MDP adapter.  For #3, I picked up up online, any will do. 

The iMac does not even need to fully function, for example, if you have a problem where the login in not working or it is not fully booting, it will still function as a monitor. 

This works with an Macbook Air circa 2015 as well.   All you need is to make sure you can deliver the video signal from the source Mac to the iMac with the least amount of adapters.  

It does not work very well with Windows computers, I know of folks who have done it but I never got it to work.  I admit, I don't have a lot of Windows computers and I didn't spend a lot of time on it. 

Largest Drawback - the iMac takes a lot of power and puts out a lot of heat, just to be a display.   It also takes up a measurable footprint.   During the Pandemic work from home, it did provide me with a very high quality 27" display and I got my money's worth. 

Wednesday, March 18, 2020

GeoThermal Open Loop : Too Loud? How to reduce noise from GeoThermal heat pump

The Situtation

A few years ago I had the opportunity to explore a GeoThermal Heat Exchanging Pump for my heating and cooling.   The plumber I used was a subcontractor and I did not pick out the unit that was used for the job, but simply had the specs outlaid.  Once the system was up and running, it worked great at providing heating and cooling functions and seemed to be far less costly than a propane fuel driven heating system.  The system was LOUD, 90+db loud.  So I scoured the internet and here is what I did to resolve my issue.

The Journey

The internet is a fantastic place, and the forums, posts, and expert advice sites out there are very helpful, which is why I am writing this post.  After analyzing my system it appeared that the bulk of the noise was coming from my TACO brand flow regulation valve, which was generating a great whooshing sound that accounted for most of the annoying volume of the system.  It also generated a jarring swoosh sound when opening as it was taking 40-60psi and releasing it into the open loop drain.  So this is where I focused my attention.

After wrapping the pipes in pipe insulation and having that reduce the +db level by only a handful, I decided to re-plumb some of the work that the plumber did to provide water to my system.  I didn't like the bends and curves that he chose and I wanted a more hidden and direct run to my system.   I visited the local hardware and home centers and settled on the Watts Pressure Reducing valve.  My hope was that the reduced pressure in the system would allow the TACO flow control valve to keep the 15gpm desired flow rate without having the side effect of controlling the pressure across that valve.

I installed a standard ball valve from the source of my water ingress, 3/4" PEX.  I then installed the Watts pressure reducer with some brass PEX adapters on each side to connect to the PEX.  I then transitioned to high pressure CPVC which the original plumber had used to continue to my exchanger.  I re-energized the system and tried out the GeoThermal unit.  Still lots of noise; insert sad face here.  But alas,  I had not adjusted the pressure reducer yet.  So I adjusted the screw nob on the Watts unit and slowly the sound rushing past the TACO flow valve continued to get less and less.  I finally got it to be fairly quiet and I used a ball valve that I had after the Taco valve to do some fine adjustments as well.  I closed that post value a little bit to apply some back pressure to the TACO valve which got rid of all the noise.   The Watts reducer has a small sound however I have to step up on a ladder to hear it.

The Evidence


I started out with some crude measurements using my mobile phone's Decibel meter.  It started in the low 90s near the TACO valve.  I also want to point out that my TACO valve was foolishly mounted to my cold air return duct, so you can image this sound traveled throughout my house as well.  It was hard to have a conversation in the lower level where this unit was, even across the room, but it also caused the TV and conversations to have to be loudened when it turned on.  I was able to get the sound down to the high 80s db when I slightly closed the ball valve leading to the unit and insulated the pipes, but that was only able to be done so much before I was over-limiting the 15gpm and the unit would shut off due to low flow.  So what did I find after installing the pressure reducer....

After the pressure reducing valve, I now have a Decibel reading of the mid 70s, which is the sound of your dishwasher or refrigerator running.  The sound is mostly the compressor running in the Geo unit which has a ton of the sound deadening technology.  I want to remind folks too, that the +db scale is not linear, so a reduction from 90 to 70 is very measurable due to the logarithmic nature of measurement.  When I close the door, the sound is just like a standard forced air system.

The Value (for those with TLDR issues)

In summary, if your GeoThermal system is making a large whooshing sound or you hear a lot of water noice when it is running, try a pressure reducer and you will fall in love with your system all over again.  I hope this helps you.

Thursday, January 24, 2019

Site2Site VPN between two Tomato routers via OpenVPN

Site to Site VPN with two Tomato based Routers


Recently I was bit by a setup on a site I manage where two Tomato based routers talk to each other on a TUN and TAP connection.   One of the routers configs got corrupted in a power outage and my backup was corrupt as well.  This left me with a lack of documentation on how to recover.   This is my copy of my configuration so that both you and I can setup two Tomato based routers to have a VPN between them.

Credit:  I owe Steve a great bit of credit from the URL below. Thank you!

Update20200501 : This was updated slightly to reflect some of the changes from Fresh Tomato (2020.2)

The Server

This is the key configuration.   I recommend not starting the VPN with WAN until you get it right.  So uncheck that.   For the Keys, see the link above. 

TUN based setup (routed)


TAP (bridge) based setup


The Client


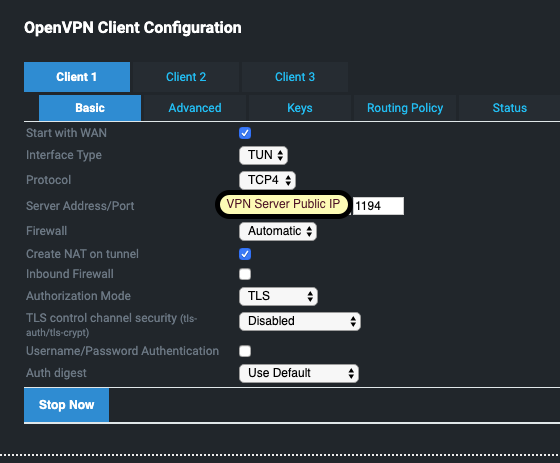
TUN routed VPN (layer 3+) 

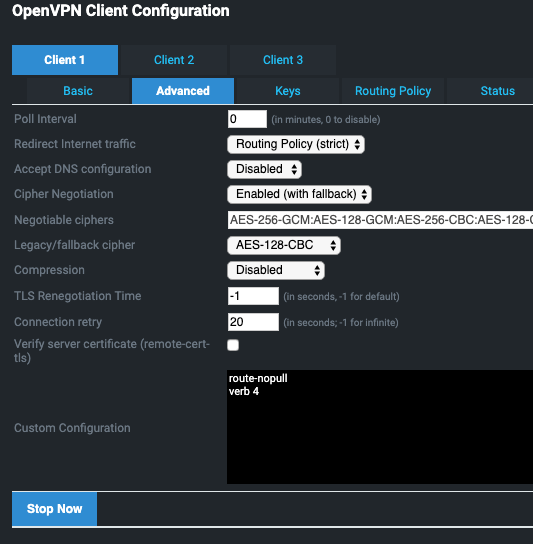
The client configuration needs to match the servers in terms of ciphers and compression.  My settings are shown below, but you may be able to adjust yours to match TCP vs UDP and compression types.  Remember to make sure your routes allow you to route traffic to your remote's LAN network (a TUN VPN) and not the VPN network which will be a different IP address.   The goal is to get the IPs on your client normal LAN to talk to systems on your remote LAN, not on the VPN network point to point between the routers. 


OpenVPN Fresh Tomato Client
OpenVPN Fresh Tomato client Advanced config

(optional)TomatoUSB client advanced


This is what your connection will look like if it is configured correctly from the client side, you will see TUN data and TCP data in both directions.   


TAP Ethernet Bridge

This method extends the ethernet network between locations across a VPN connection.   This will make your IP space the same and allow you to use the DHCP server on both networks.  Be careful, as this will create a common collision domain, and allow multicast and if you are not careful really mess up your network.   Do not set the VPN to start on boot until you know it works, so you can restart your router on either side if something gets borked.   This setup is the same as the setup for the TUN configuration above, except the first page.   I used the same certificates for both.   


Separate WIFI w/ TAP


Creating a virtual Wifi and VLAN on your client to allow you to have a bridge AND a TUN vpn

coming soon. 


Wednesday, December 6, 2017

Adding Google Cloud Package to your apt sources via cloud-init

Install kubectl from Google via cloud-init

Quick-answer:

You need to add this to your cloud-init:
 sources:
    google.list:
      source: deb http://apt.kubernetes.io/ kubernetes-xenial main
      keyid: BA07F4FB

      keyserver: pgp.mit.edu

The TL;DR Story

Like you, I am a fan of cloud-init.  It is a very straight forward way to handle sending metadata to cloud provider instances.   A lot of changes have been made to cloud-init over the past few years so I took some time to look into a few of them.  I needed to install Kubernetes (k8s) tools and I wanted to use the Google Cloud Package deb repository as the source.

I could have used one of the many  curl methods to install k8s, or some other manual method with bash, but I wanted to do it a clean cloud-init way.   I also tried installing the GCE tools and using gcloud to install kubectl, but I am an AWS user and that did not seem to work well on my ec2 instance (hung with dpkg and did not do anything).

Here is what I found as clean approach to my problem:

Setup the cloud-init apt: configs

My cloud-init YAML for apt looks like the image below.  I'll try to explain each of the major pieces needed for adding the Google repo. Note, I stopped using the older format of apt-sources: and switched to this format that is in cloud-init v17.x+

Image of apt config


  • google.list:  This is the source that will get added to the /etc/apt/sources.list.d path on your Ubuntu instance.
  • source:  This is the deb repo path.  I obtained this path from this guy.
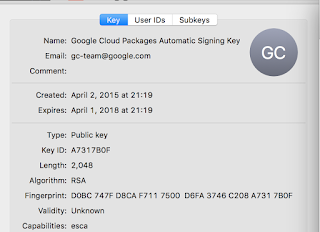
  • keyid:  This was the tricky part.  I used my gpg-keychain app on my Mac to search for the Google Cloud Packages Automatic Signing Key.   I knew I had to find this key because of these documents.  Once I found Google's entry in gpg-keychain, I got the Key ID like shown below.  I then stuffed it into this field in my cloud-init.
    gpg-keychain showing the entry for Google Cloud Package key
  • keyserver:  I added this for good measure to make sure that cloud-init could find the key, since that is where my gpg-keychain app had found it.  I probably did not need this. 

Making sure kubectl (Kubernetes) was installed

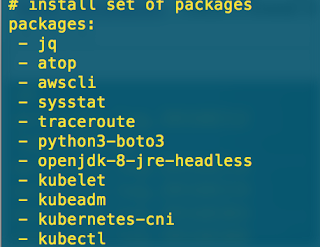
Simply adding the item to the cloud-init packages: list made sure it was installed.  The below list of packages is more than just for k8s; I shared my whole list for reference.
cloud-init package: config example

Logs to prove it

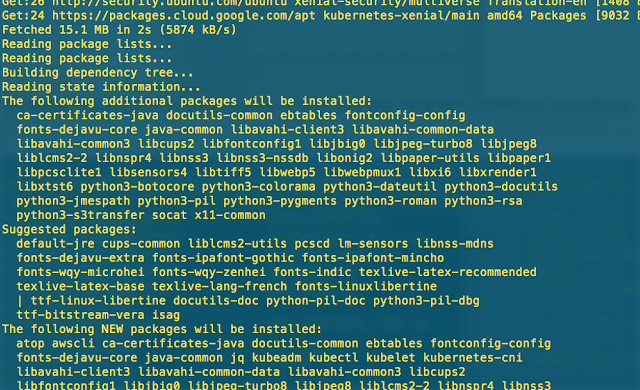
Here you can see that my repo was found and my packages were installed
show logs of proof that my Google apt repo was found and used

Monday, March 20, 2017

A Consumer’s Response to Amazon S3 Service Disruption of 2017

A Consumer’s Response to Amazon S3 Service Disruption of 2017

Only a handful of events across the Internet are impactful enough to become a topic that every news agency, blogger, and technology professional talks about. One of those events happens to be an interruption to Amazon’s Web Services platform, AWS. Chances are you remember where you were when one of these events happened, either as a consumer of a service that was impacted or a consumer of the AWS service that was impacted. In late Winter of 2017, Amazon had an incident with their S3 service that ended up impacting most of their services in the us-east-1 region. Here are some thoughts on Amazon’s public response to that outage.

Background

First, I encourage you to read through Amazon’s response of the incident, especially if you are unaware of it. It is a great summary of the event and what let up to it. I want to pick out a few values in the response that those of us in the industry should take to heart. 

Observations of Values

When reading the response from Amazon, I could not help but notice that the tone of the correspondence was very transparent. The summary starts off by clearly stating that an associate at the organization performed an action that directly triggered the event. There was no sugar coating, diversion, or deflection. They did not blame computers, blame some third party, or throw their associate under the preverbal bus. As an organization, they owned the event, and stated that a qualified associate simply made an error. As an error prone human who has worked on production systems for several decades, I could not help but empathize with that associate. The open admission of a misstep and the focus to move past that and on to what can be learned was forward thinking.
Throughout the summary the focus was on what the assumptions were and why the result did not match the assumption. While reading, it was hard not to pick-up on the blameless language that was used. For example, take this excerpt from their summary:
“While this is an operation that we have relied on to maintain our systems since the launch of S3, we have not completely restarted the index subsystem or the placement subsystem in our larger regions for many years.S3 has experienced massive growth over the last several years and the process of restarting these services and running the necessary safety checks to validate the integrity of the metadata took longer than expected.”
Amazon built in some resiliency and regularly practiced small destructive events to ensure resiliency, recovery, availability, and stability. They continued on to suggest that the system failed the people. Rather than blaming the associate, the process, or some outdated documentation, AWS instead highlighted their mission to blamelessly make their associates successful. How? They indicated they modified some practices to , “remove capacity more slowly and added safeguards to prevent capacity from being removed…”. Further on, AWS admitted they eat their own dog food and that ironically impacted their ability to post status updates of their services. “…we were unable to update the individual services’ status on the AWS Service Health Dashboard (SHD) because of a dependency the SHD administration console has on Amazon S3.” These are very important observations and so is what they indicated they learned from it. 
Numerous times through the summary, Amazon articulated where an assumption broke down, but then continuously identified an actionable improvement to empower their educated associates to be more successful in making educated decisions. 
By factoring services into cells, engineering teams can assess and thoroughly test recovery processes of even the largest service or subsystem. As S3 has scaled, the team has done considerable work to refactor parts of the service into smaller cells to reduce blast radius and improve recovery. During this event, the recovery time of the index subsystem still took longer than we expected. The S3 team had planned further partitioning of the index subsystem later this year. We are reprioritizing that work to begin immediately.

Thoughts

No matter how well you prioritize your work queue, there is always an opportunity cost. Sometimes we choose wisely, and sometimes even if the choice was wise the result has visible impact. I was comforted in knowing that some of the most talented and forward thinking engineers and leaders in the industry are just as human as I am and make mistakes. It is not the avoidance of mistakes that separates you, but rather how you handle the mistakes and move forward.
As humans we all make decisions, some easier than others. At Amazon they appear to try to setup their associates to be successful with decisions by allowing them to make educated choices and plan for possible human error. They achieve that scenario by transparently owning the incident, blamelessly evaluating each incident to identify areas where they can continuously improve
Face it, this kind of incident could have easily happened to you. Like you, the engineers at AWS try to juggle many items at the same time, and show up to work to do a good job and make a difference. Just like AWS, you too will make a mistake that will impact your customers or patrons. Questions you should ask yourself include: have you setup your team, colleagues, and partners for success? Are you transparently admitting your weak points, owning them, and taking the opportunity to continue improvement? Are you fostering a blameless culture to help empower future success?  The organization I work for is venturing to answer these questions; how empowering!

Sunday, March 20, 2016

pam_duo with MacOSX for Duo 2 Factor Auth via SSH


(updated: 20230328 : just verified this still works with the latest 2.0 version of pam_duo UNIX.  Go Duo) 
Today I decided the duo_unix.so was just so so and I needed something more.  Being a fan of DuoSec I decided it was time to determine how to get pam_duo.so to work on my Mac.


  • First, I started by checking out the code and reading their documentation online.
  • Next I made sure that my XCODE was in good order and I had the command line tools and library installed.
  • I then downloaded the latest released package


curl -LO https://dl.duosecurity.com/duo_unix-latest.tar.gz


  • It was time to build, but I needed a few requirements.  Specifically I needed the openssl libraries as Apple has their own SSL (Common Crypto).  I had to install those.  I use brew, so my attempt was simple
brew install openssl

  • Then, it was all about configuration of the make. IYou will see I  used a poor --with-pam prefix as it should have been /usr/local/lib or /usr/local/libexec but this is to your preference.   Remember, /usr is protected by Apple's gatekeeper so you will have to deviate from the defaults.  


./configure --with-pam=/usr/local --prefix=/usr/local --with-openssl=/usr/local/opt/openssl


  • make and make install dropped all the pieces in place (as root/sudo of course)
  • Then, I followed the documentation on Duo's site and referenced my library for the pam_duo.so file explicitly.  My line was
auth       required       /usr/local/pam_duo.so

Enjoy as now I can ssh as any user and get asked for duo.  If the user is not setup with a Duo account, it politely tells me so.   What I didn't verify is if the brew version of duo_unix supported the pam module, as I thought it was just for the login_unix which is not very flexible.